Tuesday, 31 May 2011

Whoopsi Daisy 'Lace & Ribbons' challenge

Morning all - another post today as this should have been done yesterday - however I found out last morning that my laptops got loads of viruses, so I can't use it till its sorted. I thought I was going to be totally out of action, however I have manged to borrow this old computer off my Mum & Dad, which has sat in their loft gathering dust for years. I've only been using it for a few hours & I'm kind of wisheing I didn't bother! Its sooooo slow & I've absolutely NO patience with computers what-so-ever. Bets are on for how long it'll last before it goes in the bin! (or through the window) haha.

Anyhow on to my card, I went for the slightly vicorian, vintagy distressed look, with a pretty, chintsy twist, not really what I'd consider to be my thing at all - but I do like the end result!..

Photobucket

I used sheet no 158 for the lovely victorian looking girly & sheet 29 for the stunning umberella - which I just LOVE!!!

Photobucket

COPICS:
Skin: E00, E11
Cheeks: R20
Hair: E43, E47
Dress: B000, B32, B95, B39
Dress trim: G000, G21, G99
Bows & Shoes: Y000, Y11, Y15
Swing & rope: E43, E47
Glitter highlights: Doodlebug design - lily white

Photobucket

Papers by Laura Ashley, Flowers mostly from Wild Orchid Crafts. Mini-alphas & sentiment by Cosmo Cricket.I'm really lovin my Flower Soft at the mo & its so funny cause its sat there for ages gathering dust & I really didn't think it'd be my thing at all. But since I've used it a few times I just LOVE it & will defo buy more when this lots run out.

Photobucket

This is the second card I've done with lace all around - the other one was a totally different style, but it still really works for some designs & I knew all along I wanted to do it with this make, it actually was my starting point for this.

Anything Goes 'Masking' challenge

Hey there & welcome to the Anything Goes blog hop!  We are celebrating as 1 year ago the Anything Goes challenge blog was born & hope you'll come in & join the fun - theres some prizes up for grabs. I've listed the order of the hop below so if you get lost you can find your way again. If you've not come from the beginning & would like to do the hop then pop back to the start at the Anything Goes blog using the link above. You'll find a link to the next blog along with a 'hidden' letter or 2 on each of the blogs. You need to collect all the letters & make a note of them. At the end of the hop - you should have a scrambled 2 word phrase, when you've worked out the phrase (bear in mind the occasion - which should give you a clue if your struggling!) then leave your answer at the end of the hop. Also to be eligable for the prize you will need to leave a comment on each of the DT blogs you visit along the way. If you also choose to enter this fortnights 'masking' challenge - then you will automatically be entered twice for the prize, along with the usual perks of the challenge including top 3 & random winner. Heres the blog hop order:

Start: Anything Goes challenge blog
Annie
Cheryl 
*** Deb.x - YOU ARE HERE!!! ***
Katy 
Kathryn
Lessa
Lynne
Sandra
Steph 
Val 
Tamara 
End: Anything Goes Challenge Blog 

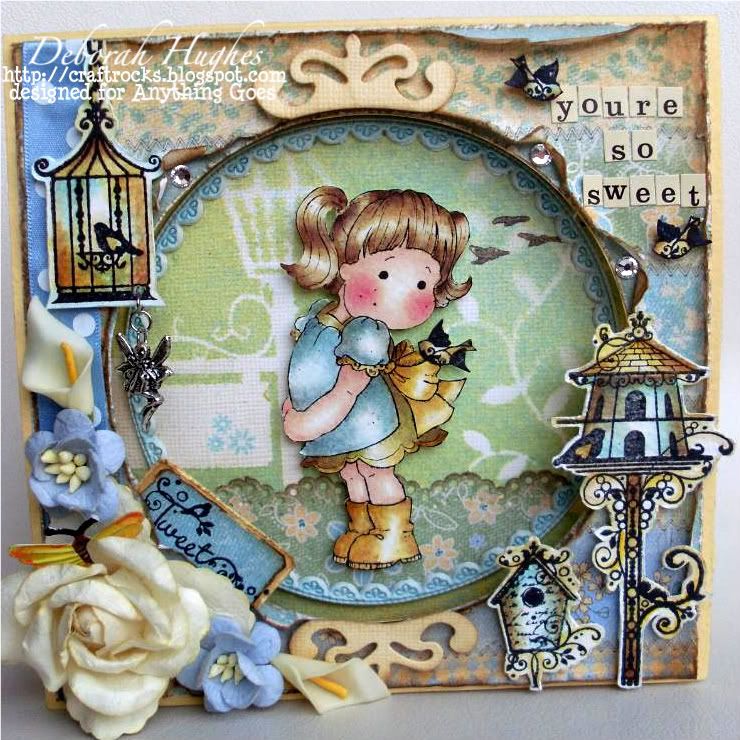
Now onto this weeks challenge which is 'masking' & since I got my mica sprays & a selection of masks as part of a competition prize I've been enjoying experimenting. However I'd not used them on a finished project yet, so was raring to give em a go! I've used 'Hello Little Butterfly' which amongst other products I've used is from The Craft Den, which is a fab little on-line store defo worth checking out. There also celebrating by having a big MEGA SALE at the moment including some gorgeous 12x12 papers for just 79p from 99p as well as free postage on orders over 10.00. So why not head on down there & take advantage using the link above...
Photobucket

Papers are from an old HOTP collection. The other birdy related stamps are also from a HOTP clear stamp set. All images have been stamped on watercolour papaer & coloured with Distress Inks. Notice the bird on Tildas bow - anyone who knows the stamp - no your eyes are not decieving you & Tilda fans, don't worry theres not another Tilda stamp you haven't heard of! - I've used a masking technique to mask the butterfly on the origional image, then stamped the bird in its place. See tutorial at end of post below...
Photobucket

DISTRESS INKS:
(Main Image)
Skin - Tattered Rose, Old Paper
Cheeks - Fired Brick
Hair - Old Paper, Frayed Burlap, Walnut Satin
Dress front - Tumbled Glass, Weathered Wood, Frayed Burlap
Dress back & bird - Shabby Shutters, Frayed Burlap
Bow & Shoes - Old Paper, Scattered Straw, Frayed Burlap
(Front)
Birds & bird houses - Tumbled Glass, Shabby Shutters, Scattered Straw, Frayed Burlap, Walnut Satin

Photobucket

...Blue flowers from Wild Orchid Crafts all others available soon from my e-bay store. Tag is handmade & stamped with sentiment from HOTP set....

Photobucket

Mini-alphas by Cosmo Cricket spell out 'You're so Sweet' sentiment - notice the little Sworofski crystals hidden under the rips - these never show up so good on photos, but in real they are soooo efective & really sparkle!

Photobucket

How gorgeous is this fairy charm? - the perfect finish to this make. Also just how stylish are these HOTP bird cages - I LOVE them! Below is a pic of the inside & a tutorial on how to mask

Photobucket

MASKING TUTORIAL:
1) Cut just short of a 6"square of white card-stock.
2) Choose your masks - I have used 'That Special Touch of'', 'post' & 'vines' masks
2) Choose your mica sprays. I used Tim Holtz Distress Inks (re-inkers) in Tumbled Glass & Mustard Seed. I mixed a few drops of each colour seperately & filled with water in 2 mini-misters, then added a bit of white mica powder to give a shimmer. (You could of course use pre-made mica mists like glimmer mists)
3) Position the masks on the card-stock, if you want a really clean edge then consider using a re-positionable spray adhesive, however I quite like the soft edges as they give a dreamy whimsy feel. Now spray your micas over them. Concentrate the 2 colours in opposite corners, so the whole surface is covered but there is a definate colour blend in to yellow or blue in the corners, mixing into a green in the middle.
4) Leave to dry & remove the masks - you now have your background!
5) Stamp the birds flying away in archivable ink (I used Versa-fine 'Sepia') & the tiny flowers on the sign in Tumbled Glass Distress Ink

STAMPED TILDA IMAGE MASKING TUTORIAL:
1) Stamp your image onto a scrap piece of paper. If you have something with an allready sticky back, such as post-it notes its even easier - but not essential.
2) Cut out the section which you are going to 'mask' (the bit you want to get rid of) in this instance - the butterfly
3) As this is a small area I'm masking I found it easier to adhere this to the actual stamp itself as its a bit fiddly, but for masking larger areas theres better techniques involving masking the paper.
4) Don't forget to ink up your stamp 1st, then adhere the cut out section directly over the corresponding part of the stamp if your not using post-its then you could use double sided tape (obviously leave the backing on so it doesn't stick to the paper on the other side!) you could try glue sticks it may even stick just to the wet ink without the need for adhesive - so just experiment first to see. (basically you are preventing the ink from coming in to contact with the paper)
5) Now when you stamp on to your watercolour paper - you will have the whole image minus the masked section. You can now add the bird stamp in its place.

Photobucket

The flourishes at the top & bottom of the apature are cut from a Spellbinders Fancy Tags 3, I've just cut the flourises of the 2 ends of the oval shaped die.

Your next stop is Katy

I'd like to enter into the following competitions:

Friday, 27 May 2011

Card Makin' Mamas - Use up your Scraps challenge

Morning all & it's Friday again, I really don't know where this weeks gone, actually I really don't know where the whole months gone! - Time always flies, but this month of May has just come & gone so quickly, where does the time go?!!!

Anyhow the challenge this fortnight was to 'use up your scraps' & we've kindly been sponsered by Bugaboo, which if you've not heard of is a stamp company specialising in digis, but theres also some rubber available too. I have to say I am a rubber girl (does that sound a little dogey in a rude sense, or is that just me?!! haha)

So I choose to work with there very beautiful flower swing. I also invested in 2 others the 'flower can' & the 'fancy umberella 1'. I've really enjoyed working with them & I LOVE all 3! The value is amazing too, they should have been 3 dollars each (which most single images are) but when I checked out I got them both half price! - So each image worked out at just over a pound each - BARGAIN! - The images are e-mailed to you instantly (which is such a great perk of digi stamps) & you get one normal image, then one with a transparent background, so you could build scenes on a photo editing or publishing program really easily, which not all digis do & its a real benefit making them really workable & easy to use. Theres so many to choose from & I'm sure soem of you will be familiar with some fo the fab cvharacters they do, which the rest of the DT have used click here to check them out & enter your creation. But I wanted to show a bit of a different style which may not be your first thought on how to use them, so I wanted to show just how versatile they are, the different kinds of style they can creat & how well they work with stamps you allready have. Click here to check them out..

Photobucket

Image is 'Sitting Angel Tilda from the 2010 christmas collection, which I thought was in keeping with a use up your scraps challengs, as it shows how you can use your stamps out of season. This image in particular is amaingly versatile & I chose it cause I love the way her hands are, perfect for 'holding' the umberella which I knew I really wanted to use. Image has been coloured with Copics, then highlighted with 'Sweet Pea' flower soft, which I just can't get enough of at the moment - I LOVE that soft shabby efect it gives & your not limeted to using it on your stamps. Notice I've added some around the edges & corners, which helps blend & co-ordinate the images with the background...
Photobucket

COPICS:


Photobucket

I'vve also used Viva declor pearl pen in salmon to create some faux swirl flourishes

Photobucket

Now you may be wandering - how did I 'use my scraps?!!' well....I confession time I didn't use scraps of paper - the pad is DCWV nanas nursary stach & is actually new. My Sizzix machine has just broken, my Dads taken it apart & the aliminium frame has snapped (I think its me forcing dies through it trying to cut card thats to thick for that type of die...naughty me - lessoned learned!) Anyhow I ALWAYS use some kind of dies on my work, so am really feeling not having it. I did check through all my scraps & have loads cause never throw anything away, but all the ideas I had for each collection involved needing my die-cutter, you have to be quite inventive sometimes using scraps & I just didn't feel I could be without my beloved Sizzix & wouldn't have been happy with the standard of work - which ultimately I decided was more important!
Soooo plan B - I decided to get inventive with the challenge instead & come up with this little idea, which I thought was still very much in the spirit of using scraps & generally being frugal. Don't know about anyone else, but now I'm using loads of digis for all my DT work, I've loads & loads of A4 smooth white card (suibtable for Copics) with different images on, but always have loads of 'wasted' space on the sheet. So I used an editing program & positioned the image in the right place to be printed in some of the spaces, therefore using up the otherwise wasted space on the paper & with the expensive prices of speciaslist paper nowadays, every bit counts! - So little tip there for you, I hate wasting anything so thought it was a great idea! - Big up blog challenges too - I love it when you learn or create something you wouldn't have done otherwise because of these types of challenges & that is why there sooooo good to take part in. So we'd love you to come & join in - what will you learn/ create?

Photobucket

I'd like to enter into the following challenges:

Monday, 23 May 2011

Whoopsi Daisy 'Happy Birthday' challenge

Morning crafters! & were onto Monday again, which means another Whoopsi Daisy challenge. Now the more I use these beautiful images the more I all in love with them, if you haven't allready seen what they've got - your missing out I can tell you! Head over to theWhoopsi Daisy store & check them out, at less than £2.00 for 4 images the value speaks for itself, but at the moment its also buy one get one free, so thats a staggering 8 images for under £2.00. Most rubber stamps of this quality you'd pay around £8.00 for just one & although I have to say I do much prefer rubber stamps, you CAN achieve the same results when you're working with a good quality dgi like these. There's endless images to choose from of beautiful ballerinas, fabulous fairies, gorgeous girls, amzaing angels & some bonnie boys too. Well thats enough of the describing, my English was never that great! haha.

Also don't forget to go to the Whoopsi Daisy challenge blog to see the rest of the DT work - as always theres some real stunners & perfect inspiration if your thinking of getting some WD images, or for entering the challenge for which you can use any image, but why not give some Daisy one s a try? - I'm sure you'll be hooked like me!....Now enough rambling! onto my card, which I'm extreemly pleased with. I may even go so far as to say it's my favourite?! I've used sheet 215 (scroll down to see sketch used)...

1 more quick thing I appologise for the bad image quality. My memory card broke the other day & as I have an 8mp camera, without a memory card it litterally only stores 1 or 2 images before the memorys full, soooo just figured out how to change the quality to normal from fine & how to use less mega pixels - so I can now get about 10 on at a time. But unfortunately, that means crappy images till its sorted...SORRY!!!!

Photobucket

Now how stunning is that image? & I think she looks so pretty with these lilacy pink & teal colours. This paper pad is just to die for. It is Annalea by Prima & I'd strongly reccoment it to anyone, again I may even go as far as to say its my absolute fave! Imade has been coloured with Copics, had a bit of a disaster when I dropped a dark green brand new Copic on my beautifully just finished image that I was really pleased with (without the lid on!) leaving 2 whopping green marks on the lovely pink skirt & another on her right elbow. So have gone a bit mad with the white highlighter to try & cover it - which I actually think its done the job...Can you spot it?!! - little tip for you there I stumbled across by accident! 

Photobucket

COPICS:
Skin - E00, E11
Cheeks - R20, R22
Hair - E00, E43, E47
Dress, shoes & flower in hair- V000, V01, R81
Dress trim - RV000, RV13, RV23
Wishing Well - BG000, BG10, B02, BG15
Inside of Well - as for 'Wishing Well' & W01, W05
Wooden sides - R00, R20, R37
Metal W01, W05
Handle - R00, R20, R27

Photobucket

...Large flower from Wild Orchid crafts, roses & pins will be available from my ebay store later this week.
I've added a butterfly on a chain & We are Memroey Keepers pewter findings. Lace by Prima. I've highlighted different areas & the image itself with 'Sweet Pea' flower soft...

Photobucket

...Grungeboard hinge has been cut in half, (this is the bottom bit), I've painted with white acrylic, inked the edges with Old Paper Distress Ink & distressed with a craft knife, lastly I finished with HOTP pewter brads. Little raffle style ticket has been cut from the Prima pad & mini-alphas are Cosmo Cricket...

Photobucket

Ok so one last look, but first just want to mention the sketch I've used, which is by one of my very favourite craters Chelsea-Lee from Crafting Likes Pieces. If you don't allready know of her - you really MUST go & check out her site she is breathtakingly talented & visiting her site just blows me away every time I go there. She also has a monthly challenge blog CLP challenge & her sketches not only look like a beautuful finished piece of art on their own, but have great workable layouts that have been creatively and cleverly designed & are the only sketches I can guarantee to be bang on every time & don't need to be re-worked in any way. A LOT of educated thought goes into each one & they really are the best sketches I've ever seen, I'm sure they'll inspire you too....soooooo heres this months...


...Told you they were beautiful! & as you can see below I've followed it exactly (although that may not be totally clear as some of the designs hidden under the flowers! ha) Also notice all the edges have been inked & distressed & the main square has been matted on to kraft card-stock...

Photobucket

I'd like to enter into the following competitions:

Crafting Lifes Pieces - Sketch (above)
Crafty Sentiments - Childrens cards
CCEE Stampers - April showers May brings flowers
Crop Stop - Happy Birthday
Delicious Doodles - Let the sun shine
Crafty Catz - Anything Goes
Reasonable Ribbon - Anything Goes
Totally Gorjuss - Water water
Sweet Stampin - In the garden
One Stop Crafts - Fairytales
Crafty Emmas Store - Embellish it
A Gem of a Challenge - Aqua, lemon, pink
Dream Valley - Dig out the old to use with the new (old tim holz grungeboard bracket, new papers & stamp)
Pixie Cottage - Here comes the sun
Pollycraft - Embellishment bingo (top row across - lace, charm, pearl pins)
Kaboodle Doodle - Distress
Scrap it with a Song - 'Little bitty town'
Paper Playtime - & a charm
Stamps R Us - Going digi
House of Gilli - Flowers

Friday, 20 May 2011

Wags 'n' Whiskars Blog Hop

Good Morning again crafters! Woo Hoo its finally here! - The Wags 'n' Whiskars blog hop begins today & apart from getting a first glance of the images available (thats if you haven't allready seen a few sneak peaks, if not be sure to check out my 2 previous posts) but you'll also be in with a chance of winning the full set! sound good? Well all's you've gotta do is comment on each of the DT's blog & IT COULD BE YOU!!

If your going in order you should have come from Joy, but if not then go back to start at the Wags n Whiskars blog & theres a list there as well as one at the bottom of this post if you get lost along the way (I know I often do & go off in all manner of tangents!) so just pop back there for your bearings before hopping on! & Don't worry if you've come from the beginning your nearly there...just 1 more stop then back to the start!

So onto my card, I've used 'Millies Little Prince' which is simply adorable. The papers are 'Fairest of them all' by Imaginicise & I thought were just perfect for this image...

Photobucket

...Flowers from Wild Orchid Crafts, image has been coloured with Copics, see below for details. The trendy little plastic pieces including the 2 owls & stamp style piece with tree & bird image are by Maya Road. Corner swirl is Sizzix architectural corners 2 (I think - will check), edge punch is Martha Stewart. I made the fence again-(you'll be sick of seeing them soon! haha) with strips of card-stock adhered with glue dots...

Photobucket

COPICS:
Skin - R000, YR000
Cheeks - R20
Hair & flowers - B000, B32
Dress - V000, V01, R81
Basket YR000, YR20
Leaves G000, G21

Photobucket

...The chipboard crown & mushroom have been painted with pink acrylic, then set with UTEE & sprinkles with white embossing powder before heating with heat tool. I've then set a sworofski crystal in the crown to finish...

Photobucket

...Crystal swirls are Prima & mini-alphas are Cosmo Cricket.I've finished the image & highlighted the flowers with blue Flower Soft & chunky flower glitter...

I'd like to enter into the following challenges:
Paperplay - Sparkle Galore
Charisma Cardz - Birthdays in Pink
Sarah Hurley - Frames (On the 'forever' acetate piece)
Crafty Sentiments - Childrens cards
CCEE stampers - April showers May brigns Flowers
Delicious Doodles - Let the Sun Shine
Crafts4Eternity - Flower, ribbon, bling
Reasonable Ribbon - Anything Goes
Photobucket

Heres a full list, incase you get lost anywhere!
Start at the Wags 'n Whiskers blog
Vicky (Guest)
Debbie (Guest) 
Heidi (Guest) 
Chris (Guest) 
Joy (Guest) 
***Deb YOU ARE HERE!!!!***
Dawn 

Once your finished here you need to head back to the Wags 'n Whisker blog.
The blog hop will will close on Thursday 26th 5:01 am GMT/00:01 am EST. Winners will be announced on Friday 27th as part of our challenge post along with the Spread the Word Winner.

Your next stop is:

MY MAGNOLIA SLIDESHOW

LinkWithin

Related Posts Plugin for WordPress, Blogger...