Wednesday 29 June 2011

Anything Goes - Letter 'D' challenge

Hi all & today I'm posting for the Anything Goes challenge blog, if you haven't allready come from there don't forget to use the link & check out the rest of the DT's work who've got some great inspiration for you as always. Then you can see what 'D's you can create for your entry! Also don't forget many supplies I've used here including the Magnolia stamps can be purchased from The Craft Den, who still have their Mega Sale on with uk p&p only £1.00 & free on orders over £25.00..

So onto this fornights challenge using the letter 'D', which seemed the perfect excuse to do a dance feature, so I dug out my pretty Magnolia ballerina. I also came across a Z card challenge & haven't ever done one yet on my blog, so fancied giving it a whirl!

Photobucket

I folded a Z card as normal with 3 mountain & valley folds in 3 diferent sizes getting progressively bigger, I then attatched another piece of card to the back fold kind of like you do with an easel card. I really don't know where that idea came from & not sure I've ever seen one before! but it seems to have worked out ok. I attatched this rectangle piece...

Photobucket

...To the back fold, so it stands above past the edge like with an easel card...

Photobucket


...Although I will just say that please be aware if your planning to give it a try, it does need a little bit of pursuasion to stand up with out the folds collapsing & struggles if its on a shiny polished surface. Not so much to stop you doing this kind of design but just to be aware of it...

Photobucket

COPICS:
Skin: R000, E00, E47
Cheeks: R20
Hair: W-1
Tu-tu & shoes: RV000, R81, RV34
Ballet tights: R000, R13

Photobucket

These are Tim Holtz grungeboard letters that have been painted with white acrylic, then coated with glossy accents. I've then lightly sprinkled with lily white Doodlebug Design glitter whilst still wet & set 2 sworofski crystals on the letter 'a'. The D has been decorated with a handmade ribbon rose, set with ornate handmade pin set with beads & end cap, net & flower...

Photobucket

...The stunning die-dut tag is Spellbinders Nestabilities Fancy Tags 3 dies & the mini-alphas spelling 'live' & 'love' are by Cosmo Cricket. I then finished with tiny bow set with crystal, row of crystals & 2 paper flowers...

Photobucket

I love using tu-tu netting on dancing cards, especially ballet themed ones - it just seems so fitting?!! & looks so pretty too! The gorgeous ballerina charm is actually my old phone charm, which I just couldn't resist using!

Photobucket

I made a little bag 'o' talent to match the sentiment filled with silver micro beads which I'm particularly pleased with & think it makes a nice quirky touch!

Photobucket

I'd like to enter into the following challenges:

Friday 24 June 2011

Wags 'n' Whiskars - Summertime challenge

Hi all & welcome to another Wags 'n' Whiskars challenge, where the theme this fortnight is 'Summertime'. I lvoe this Wag image & have been dying to use it, suits the challenge too! Don't forget to use the link to check out the rest of the design teams work which is just fab as always. Also you can purchase any of the Wags images here. I've used 'Picnic with a Friend' & heres what I did with it...


I went for a Clean & Simple style, which I don't do very often & whilst its not my preffered style (more of a shabby girl) I do really enjoy doing these kind of makes & am really pleased with how its turned out - its just that, somehow I don't really recognise it as being mine if you know what I mean?
Anywho The scrummy papers & stickers are by Echo Park, the swirl die is a Magnolia Doo Hickey & the edge punch Martha Stewart Doily. Oh & the scrummy card-stock is Bo Bunny double dot card-stock, which I have to say...luvin at the mo! Image has been coloured with Copics, see below for exact colours...

Photobucket

COPICS:
Skin: R000, E00, E11, E43
Hair: E43, E57, E47
Girls dress & Shoes: RV000, R81, RV34
Pussy Cat: B000, B02
Cats ears, tongue & plates:
Picnic blanket: BG000, BG10, BG15
Grass: G000, G21, YG03
Jug, water & glasses: B000, B32
Shaddow outline: W-1

I'd like to enter into the following challenges:
A spoon full of sugar - ribbons & bows
Lollipop crafts - Inspired by a song...
...'Sugar & Spice' by The Searchers. 1963 was the year I think..don't quote me though!
Kaboodle Doodle - food & drink
Derlightful challenges - Fun in the Sun
Dutch Dare - CAS

Wednesday 22 June 2011

Simply Sassy Spotlight

Hey there! I'm thrilled today to be spotlighted at Simply Sassy & be sure to use the link to go & check out the rest of the fabulous inspiration there. As I'm sure most of you will know, the Sassy range is by Sugar Nellie & is one of their newer, exciting & extreemly stylish & trendy ranges which I just LOVE! Before being asked to do this I'd only recently discovered the range myself whilst looking through the Finky Kits site which supplies for Sugar Nellie, where I ordered 'Fabulous Darling' may fave stamp, so when I was asked to make 3 creations I immediately ordered 2 other stamps (well...any excuse!) haha. So the other 2 stamps I ordered & will be showcasing today are 'Star Dust' and 'Vintage Boutique'. If your not allready familiar with the Simply Sassy range then its defo worth checking out here.


My first creation is a topper I've used 'Fabulous Darling'. The papers which are to die for are 'Chanteuse Collection' 6 1/2" paper pad by Kaisercraft. I was absolutely overwhelmed when I ordered this pad & would highly recommend it to anyone. Apart from the designs being stunning you get little die-cuts in the back; tags; borders - that kind of thing & its just so usable & a pleasure to work with...

Photobucket

I've cut around 3 different sized frames from the paper pad, 2 are foil & the big one is velvet - total luxury!

Photobucket

DISTRESS INKS:
Skin: Tattered Rose, Old Paper
Cheeks: Fired Brick, Barn Door
Hair: Spun Sugar, Worn Lipstick, Frayed Burlap, Walnut Satin
Top & Shoes: Spun Sugar, Frayed Burlap, Walnut Satin
Stockings, hair-bow & jewellrey: Shabby Shutters, Frayed Burlap, Walnut Satin

Photobucket

I've also mastered my little sewing machine & sewn around the edges of the papers as well as distressing them for that autentic, vintage touch. The flowers are mostly from Wild Orchid Crafts & the pins will be available from my e-bay store shortly. The pretty butterfly is on a wire & bounces up & down like its flying!

Photobucket

Notice the tag which is one of the die cuts from the paper pad. I've stamped with fancy pants butterfly in Sepia ink & cut the letters also from a sentiment from the pad & adhered individually. I've then set with an eyelet & tied with some organza ribbon...
Photobucket


Challenges:
I'd like to enter this make into the follwoing challenges...
Scrap it with a song - Poker face (looking at 'face' in mirror)
House of Gilli - ribbons & bows
A spoon full of sugar - ribbons & bows
Everybody Art - Anything Goes
My time to craft - Extra images (main image & stamped butterfly image on tag)
Crafts & Me - We're in stitches
................................................................................................................................

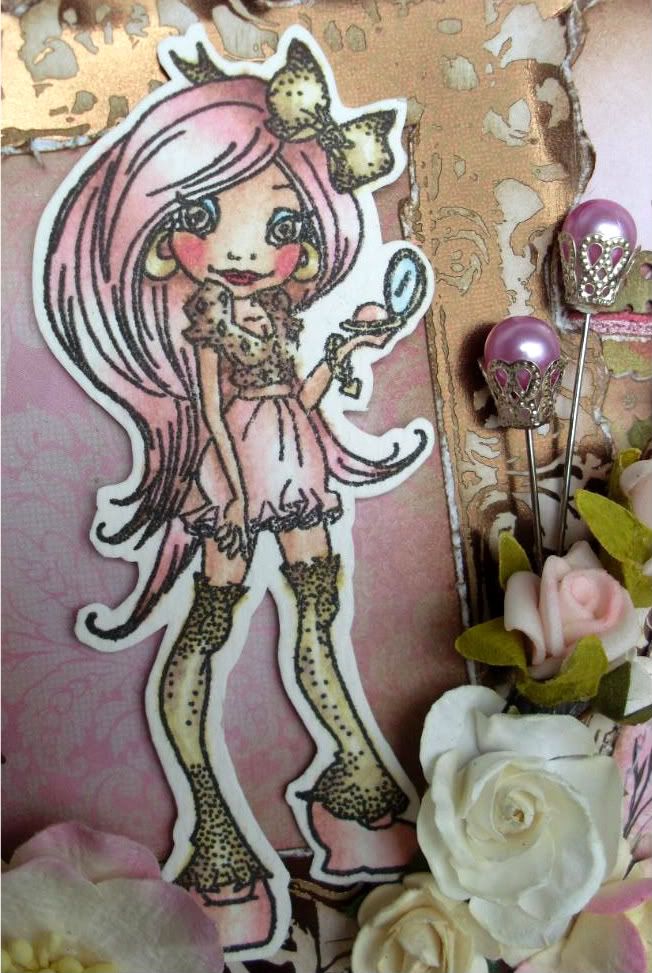
For my second card I've used 'Vintage Boutique' from the Sassy range. How cool & 'Sassy' is she?!! She actually reminds me of me, when I died my hair bright red as an older teenager & dressed with major attitude just like her! haha. She ROCKS!!! v. cool....

Photobucket

DISTRESS INKS:
Skin: Tattered Rose
Cheeks: Fired Brick
Eye shaddow: Tumbled Glass
Hair: Barn Door, Spun Sugar, Fired Brick, Frayed Burlap, Walnut Satin
Top & Boots: Tumbled Glass, Weathered Wood, Frayed Burlap, Walnut Satin
Corset & Spats: Spun Sugar, Frayed Burlap, Walnut Satin
Skirt: Old Paper, Scattered Straw, Frayed Burlap, Walnut Satin
Tights: Pumice Stone & Barn Door. Frayed Burlap & Walnut Satin shading.

Photobucket

Papers are 'Classic K Bailey' 6x6 paper pad by K & Co. The fab die-cut corners are by Marriane Design & have been cut from Prism card-stock in that gorgeous teal colour, as has the card blank itself. Notice the 3D aspect if you look at the top of the card. This is because the inside is decorated & layered, so this allows the card to still close properly.

Photobucket

All the edges of the paper have been inked with Olp Paper, Frayed Burlap & Walnut Satin ink, to give a graduated shaded effect using a Tim Holtz blender tool. I've then distressed them with a craft knife, before adhering & sewing to card-stock. Edges have then been decorated with 3 shades of Flower Soft; Russet Red; Baby Blue & Ivory. The flowers have been made using a Woodware punch.
Photobucket

................................................................................................................................................

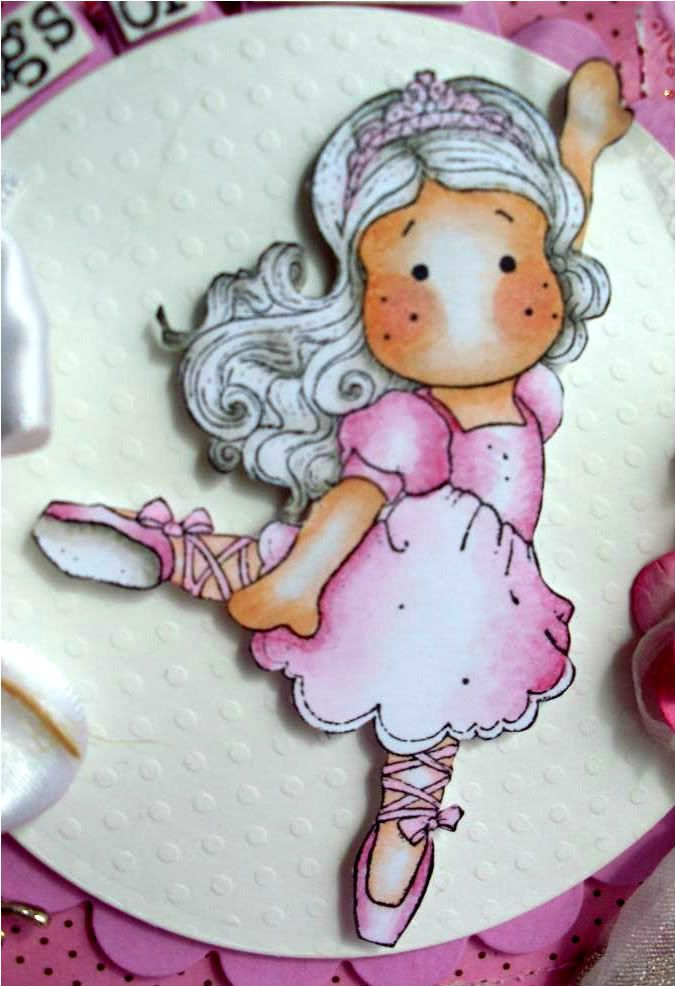
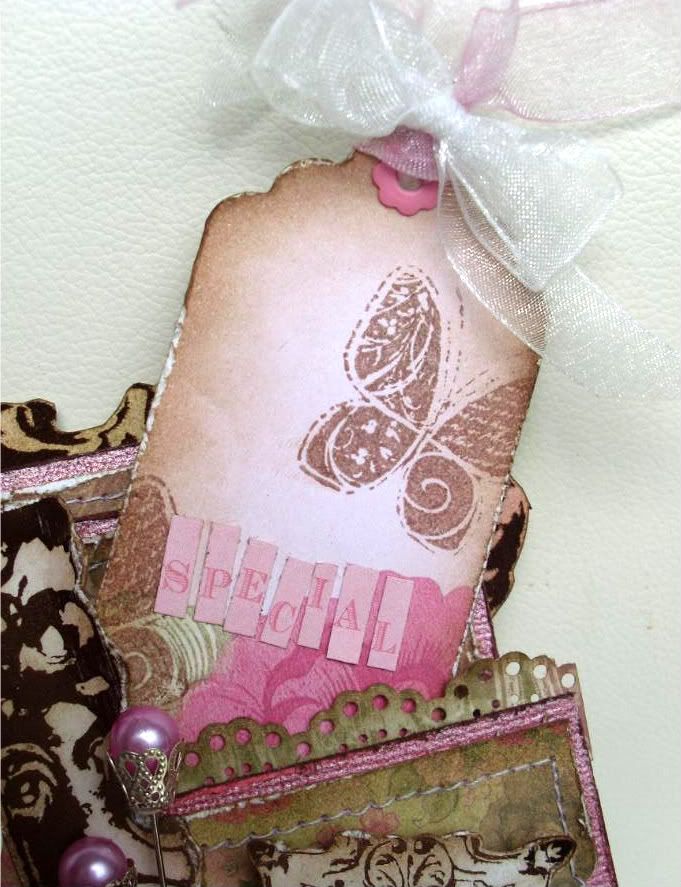
For my third make I wanted to do something a little different, so I decided on a tag & used 'Star Dust', isn't she enchanting looking?!! I was really pleased with my first 2 makes, but thay wern'y quite as pretty & girly looking as I thought they would be, so I wanted to make up for that & went for a pretty pastel colour scheme & a shabby, enchanted look. I used my Shabby Chique papers by Tim Holtz which incidently is one of the best collections I've ever had!....

Photobucket

DISTRESS INKS:
Skin: Tattered Rose, Old Paper
Cheeks: Fired Brick
Dress & Shoes: Spun Sugar, Pumice Stone, Walnut Satin
Hair-bow, socks & trim: Tumbled Glass, Pumice Stone, Walnut Satin
Hair: Pumice Stone
I've highlighted the 'stardust' with Crackle Paint

Photobucket

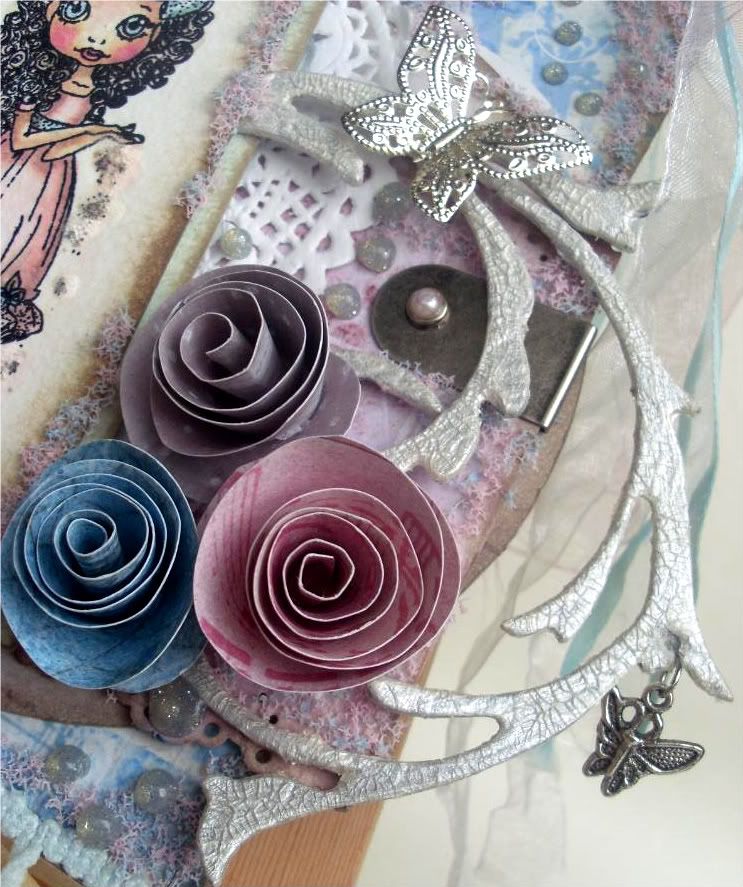
The paper flowers have been made using the spiral technique. Over sized pink pin available from my e-bay store soon, tied with twine. Metal fastner on right side is from We are Memory Keepers metal hardware tin in pewter & has been fastened with a pearl brad. The grungeboard flourish by Tim Holtz no other, has been painted with white pearl acrylic paint, then covered in Crackle Paint. Notice the little butterfly charm on the end!

Photobucket

The over sized hole has been die cut, then I've used a K & Co metal piece in the hole, before tieing with ribbon. I've made the crinkle ribbon from 3 pieces of white/ cream organza ribbon, 2 of which I sprayed pink & blue rtespectively using Tim Holtz Spun Sugar & Tumbled Glass re-inkers, mixed in a mini-mister with water & a spoon full of white mica powder for a soft shine. I then wet them & scrunched up. I've mixed together 2 shades of Flower Soft Baby Blue & Baby Pink, then decorated the edges with it, which I'm majory diggin the effect of right now. Flower Soft rocks!
Photobucket

Hope you've enjoyed my spotlight post & many thanks to Simply Sassy for featuring me!!!xxxx

Monday 20 June 2011

Happy Birthday Mia

To my darling daughter, Mia Zara Mae...wishing you a very special Happy Birthday, hope you've enjoyed your day (even though we did have to go to school taster session for the first time ever!) My little girl is growning up & cliche I know but...its all flown by so quickly & I can hardley believe your 4 years old & starting 'big girls school'. One things for sure though Princess & this will never ever change...and thats that you'll always be my precious little baby girl!

Lots n lots of love Mummy & Jayse.xxx

Photobucket

Mia Zara-Mae - 4 years old today !!!
(Mon 20th June 2011)


To my Meesie Moo, this ones for you....

It doesn't seem a minute since you were a babe in arms,
You soon grew up & we all fell for all your special charms,
Your grace, your style, your honesty your many attributes
Your beauty shines, you are divine...your just so God damn cute!!!
So to my darling daughter on her very special day
I love you more than life itself & what is more I say...
'Happy Birthday little Mees - enjoy all that you do,
Your hopes & dreams, my Meesie Moo..may all of them come true!

All my love...Mummy

Friday 17 June 2011

Whoopsi Daisy 'Free & Easy' challenge

Hi there crafters & another post catching up from my laptop troubles! Theres a great challenge ovewr at Whoopsi Daisy this week thats Free & Easy - so you can litterally do anythig! So no excuses, head on over there now where you'll find some fab inspiration using the gorgeous Diasy images which you can purchase using the link in my side bar below & enter your creation here.

I used sheet 215 with this stunenr of an image that I think may even be my fave Whoopsi Daisy image & I've been dying to use if for a challenge! So here she is & just how adorable?!!! The fab papers are Chanteuse Collection by Kaisercraft...

Photobucket

COPICS:
Skin: R000, E00, E11, E53
Cheeks: R20
Hair: E53, E43, E35, E57
Tutu, ballet shoes & hair-bow: RV000, R81, RV34
Teddy, netting on tutu & polka dots on hair-bow: G000, G21, YG03
Teds nose, ears, feet & bow: R00, R20, R27
Shading: W-1, W-5
Outline: BV00

Photobucket

Card is made from card-stock cut into a large circle using my X-cut system then scored & folded in half. A die-cut Spellbinders nestabilities scalloped circle & circle die is then added on foam pads, with the image layered on top. I've covered the car-blank in pink patterned paper from the collection, then cut a half circle using the medium cutting plate from the X-cut system & added some pretty white lace before attatching. Notice the cute little brown flower tab to the bottom right...

Photobucket

I've inked the edges of the image circle with Spun Sugar Distress Ink & sanded all the other embossed edges with an emory board. Flowers are from Wild Orchid Crafts except cream roses which will be available from my e-bay store shortly, as are the silver embossed butterflies.

Photobucket

Pretty whit heart shaped doily has been used which I've just found a great seller for on e-bay & will be adding a link to the store in my side bar shortly. 'Special' sentiment spelled out with Cosmo Cricket mini-alphas on handmade tab. I've also added 2 pins & a silver heart lock charm.


I am entering this card into the Bling it on - embossing challenge.
(Embossed edges & butterflies.)

Card-Makin Mamas With a child/ For a child

Firstly major appologies for being late with my posts. As you may know I've been having major technical problems due to my laptop being down through to having viruses on. After being without it for nearly 2 weeks its such a blessing to have it back! Thankyou for bearing with me & after a bit of catching up -everything should be back to normal very soon!

Theres a great challenge over at Card-makin Mamas this fortnight which is With a child/ For a child. So I thought I'd utilise my daughter & her creatice skills! We often draw & paint together & do other child related craft stuff, but I don't usually do cards with her & shes learning not to touch Mummys stuff. Actually shes now scared half to death after me freaking out a few times when shes got a hold of different things, so when we came to make these together she was reluctant to touch my stuff & kept saying 'But Mummy I can't use that because thats Mummy special card stuff!' which made me feel extreemly guilty as I never realise how hard I'd drummed it into her! (BAD MUMMY! haha) So make sure you grab the opportunity to get your little ones involved & be sure to head on over to the challenge blog for inspiration & to proudly share & display your childs efforts here.

Anyhow heres my attempt using the fab 'Thankyou Cat' image. I'm always at it with the easel cards, but usually do 6x6 square ones & have been meaning to do a smaller shaped one for ages. When I saw this image I thought it'd be perfect for it!

Photobucket

COPICS:
Cat: R000, R20, R81, RV34
Cheeks & ears: R00, R20
Nose: R81
Stems & Leaves: G000, G21, YG03
Left flower: V000, V12
Middle flower: R00, R20
Right flowerYR000, YR20

Photobucket

Flowers from Wild Orchid Crafts. Cute polka dot baby blue buttons tied with twine & pink 'dummy' button which hangs with twine from under the flowers are from my local market. Doily & pink lace has been added behind the image.

Photobucket

'Happy Birthday' & 'Special' sentiment wrote with Doodlebug Design rub-on alphabet letters on pink card-stock tabs. Fancy tag on base is Spellbinders Fancy Tags 3 set.

Photobucket

EASEL TUTORIAL:
You will need Spellbinders Nestabilities Circles & Scalloped Circle dies.
1) Score & fold a piece of card-stock approx 4" square
2) Using the largest of the Scalloped Circle dies, position with a slight clearance over the fold & run through the die cutter - You should now have a normal Scalloped Circle card-blank.
3) Score one side of the cardblank parrallel to the center fold approx half way (so the fold runs through the center of the circle)
4) Now fold this so when the base of the card is on the surface the top folds back down towards the base.
5) Cut another scalloped circle & line up the scallops, adhere to just the outer half only so the top of the circle stands alone & the fold acts as a hindge.
6) You can now add the patterned paper cut with the largest Cirlcle die, & decorate as desired.

And now onto my beautiful baby girls card who has done the vast majority of the work herself & done a fantastic job with the colouring. She did the flowers including the tiny leaves & petals all by herself & the cats feet & actually blew me away with the control she has over the pencils. I should probably mention she is only 3 (well 4 next week!) but even for a 4 year old I'm sure you'll agree thats pretty good going!

Photobucket
I've told her I'm posting hers too - but don't think she really understsands, so when she sees it she'll be well chuffed! Shes amazed when she sees a card I've made that she recognises on the computer & gets really excited saying 'Mummy thats yours' & 'Why have they got your cards Mummy?' Oh the joy! - they're just great arn't they? I think we could learn a lot from their attitude & way of thinking sometimes! haha. So to my baby girl - love you princess & hope you like your post, this ones all for you! mwwaaaahhh!!! xxxxxxx
Photobucket
I'd like to enter my card into the following challenges:

Saturday 11 June 2011

I miss my laptop!

Hi there - just a quick post to let you all know why I've not been around. My laptop has been in repair for the past week as I found loads of viruses on it so have been on a really ancient computer which is really slow! At first I kind of managed with it, but now its not keeping me signed in to post or comment & has started crashing all the time, so I've now totally given up with it. Me thinks it may be time for it to go to computer heaven (in the bin!) Anyhow I'll be picking my laptop up tommorrow - can't wait! how I've missed it & promise to never call it & get mad with it ever again! haha. So I'm so sorry I've not been able to join you & comment on all my fave blogs - I should be up & running again by Monday or Tuesday at the latest. Thanks for still visiting, bye for now & I'll have some great things for you very soon...
Deb.x

Sunday 5 June 2011

Wags 'n' Whiskars Blog Hop winner

Hi there & the winner chosen at random for the Wags 'n' Whiskars blog hop is

Betty Bee

Please go over to the Wags 'n' Whiskars blog to sort out the prize & to see other winners.

Saturday 4 June 2011

Wags 'n' Whiskars 'stitching' challenge

Morning crafters! & I must start with a quick appology about this post as its late. First of all I got my dates mixed up, but then I found out my laptops got loads of viruses so am now on a really slow old computer which is not only driving me mad, but won't post or comment most of the time. So I'm trying to work through it - but just being a total nightmare! -I don't know if its not one thing - its something else!!!

Anyhow onto my second post for the fabulous Wags 'n' Whiskars design team where the challenge this time is 'Stitching' so go check out the rest of the DT if you haven;t allready come from there - there's some fab makes for inspiration & you can then upload your entry if you fancy playing along by clicking here.

For my card I used 'Iris' fairy whos a real stunner & I've loved working with her...

Photobucket

...The papers are by K & Co. I'm not sure fo the collection as I've dug them out of my stash that I've had for AGES!!! I've inked the edges of the papers & card-stock with Old Paper & Walnut Satin Distress Inks, then used a craft knife to distress the edges of the papers. They've then been machine stitched with navy cotton to the card-stock. I was so excited when this challenge came up as I've had a little sewing machine there for litterally years & never used it! But when I see machine stitching on cards I just LOVE it! But have had a go before & could never get the hang of it. Well this certainly isn't perfect, but is definately my best attempt & now I've kind of mastered how to use the machine it'll defo be a regular from now on!

Photobucket

COPICS:
Skin - E00, E11
Hair - W-1, W-5, 100
Lips & inner ear - RV34
Dress & Shoes - B000, B02
Wings (outer part) - B000, B02, B05
Wings (inner details) - G000, G21, YG03, G99 fading to Y000, Y15
Mushroom top - G000, G21, YG03, G99
Mushroom spots - Y000, Y11, Y15
Mushroom base - B000, B02, B05, B39

Highlighted with blue & green Art Glitter

Photobucket

...The butterflies have been cut from the patterned paper, then highlighted with glitter & Flower Soft - which I think is becoming a firm favourite at the mo! - I don't believe I've had it sat there for months after winning it in a prize & never used it till the other week. Now I can't stop - lovin it!!! Also used it on the main images & around the edges & corners of the papers, which is actually where I'm likin it the most! - I lvoe that soft, but distressed/ shabby feel it gives. I've coloured the pins with B05 copic markers as they're actually pink! the lace is Prima I think & the flowers are from Wild Orchid Crafts & I've painted the deep blue one with mica powder mixed with a littel water for an intense colour & sprayed the roses with yellow mica mists...

Photobucket

I'd like to enter into the following challenges:

MY MAGNOLIA SLIDESHOW

LinkWithin

Related Posts Plugin for WordPress, Blogger...