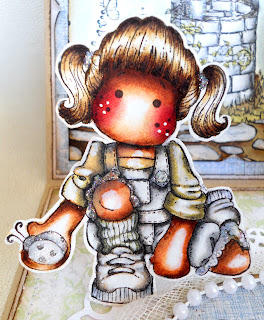
Hi all, today I am posting for The Rubber Buggy design team - my upmost appologies as this should have been posted on Saturday, which will be my day to post there. However we have all had a really bad sickness bug and I've just been completely out of action for days!
I have made a Pop-up card with a scene background I created by using a masking technique. Please see the tutorial below on the masking technique.
Above the sentiment is by LOTV on a Spellbinders oval die, layered over a Spellbinders ornate oval die cut from Bazzil cardstock. Flowers are a mixture, small white ones are by Kort & Godt and berries are by Magnolia.
The Tildas are 'Hello Little Butterfly' and 'Kneeling Tilda' from the Butterfly Dreams 2011 collection. The stone path is from the same collection, the cloud is from the With Love 2013 collection, and the wishing well is actually a Pixie Cottage stamp.
All the images have been coloured with Distress Inks & highlighted with Crystal Glamour Dust.
The Pop-up elements have been added by creating a 3D box (shown below). Begin by cutting a cm strip of card then score 4 lines - here the left pop-up is scored at approx 2", 1", 2", 1" intervals to give an idea of size. When folded into a box with the end secured they need to be adhered on the back side and bottom right up to the crease when the card is at a right angle, then position your pop-up element (in this case the Tilda's) and adhere to the front side. The card and pop-up elements should fold away flat when the card is closed, then 'pop-up' when opened.
MASKING TUTORIAL:
Make the scene above in 11 easy steps!
The general principle of masking technique is to stamp the object that is nearest to the point of view and gradually work backwards, in this case the wishing well is nearest to the front so we'll begin with that...
Step 1) Begin by cutting a square of watercolour card approx 5" (I use Langton extra smooth Hot Pressed). Stamp the Pixie Cottage wishing well image slightly to the left hand side.
Step 2) Stamp the same image again onto scrap paper and carefully cut out.
Step 3) Position the cut out wishing well directly over the origional image.
Step 4) With the 'mask' in place now stamp the stone path image, positioning so the wishing well is in the middle of the flowers that are on either side of the stone path stamp. (pic shown with mask removed)
Step 5) Re-position the mask then stamp the Magnolia cloud (from the 2013 With Love collection) so it overlaps the laft hand side of the wishing well.
Step 6) (Note: the rest of the card is created without need for the mask) Stamp another cloud to the top right.
Step 7) Position the Stone Path here (to the right of the origional stone path) and stamp.
Step 8) Repeat the previous step with the Stone Path here (now to the left) and stamp again.
Step 9) Now turn the stone path stamp upside down so that the stones are at the top. Position as shown above and stamp.
Step 10) Stamp again slightly to the right (try to fill in the gaps with stones).
Step 11) Lastly I finished by adding some tiny butterfly stamps from a Hero Arts sentiment stamp set.
I'd like to enter into the following challenges:
MDUC - Masking
Tilda's Town - Flowers Everywhere
Totally Tilda - BINGO (bottom row)
Lovely Hangler or Sweet Magnolia - Spring


Thanks Deb for share it with us. Is very instructive....and of course, the card is magnific. Elena F.
ReplyDeleteThis is just awesome! Beautiful card! Very beautiful colors and cute Tilda. Great idea with the masking!
ReplyDeleteAmazing work! I love the scene and the girls. Very beautiful. I hope you are on the mend and feeling better.
ReplyDeleteHugs Kelly
Too stunning for words Debs a work of art I love it
ReplyDeleteThank you for joining us at Totally Tilda
Hugs Susie Sugar xx
Just an amazing card, wow!!! What detail using all those stamps and thank you for the tutorial on how you did it too. Jay x
ReplyDeleteWhat a gorgeous card. The scene is like a dream! Love it!
ReplyDeleteThanks for joining us at Tilda's Town. Hope we see you again soon!
Hugs,
Diana
Extremely gorgeous!!! Thanks for joining us at Tilda's Town and good luck! Delphine xx
ReplyDeleteOH MY!! What a totally divine card! I adore your wishing well scene. I think it is awesome that you have made a tutorial as well!! Thanks so much for joining in our Masking Challenge at MDUC this week:-)
ReplyDeleteHugs
Karen
xxxx
woooooooow deb stunning card beautiful colouring as always love the gorgeous scene you created thanks so much for joining us at MDUC this week
ReplyDeletehugs sara x x x
Sooo pretty, lovely work. Thank you so much for sharing with us at Totally Tilda Jen xx
ReplyDelete