Saturday, 27 April 2013

Rubber Buggy Saturday post & LHOSM 'Anything Goes' challenge - 'Tilda sitting with butterfly'

 
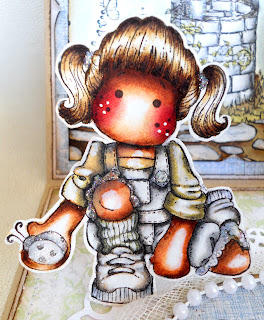
Hi all & today I'm posting for the Rubber Buggy blog and Lovely Hangler or Sweet Magnolia 'Anything Goes' challenge as Guest Designer. I have made a shaped Magnolia card using one of the new Tilda's & I just love her...how adorable?!! She is 'Sitting Tilda with Butterfly' from the new 'Once Upon a Time `13' collection as of course all you avid Magnolia fans will allready know - how loyal & enthusiastic are Magniolia fans?!! ;)
 
 
My card is sporting beautifully my new and long awaited purchase in the form of one brand spanking new Martha Stewart clay kit...& WOW...I LOVE THIS KIT!!! How soft & pliable is the clay? I just can't get over how soft it is - it's really feels more like sponge! 10 out of 10 for ease of use & same again for results (see white clay corners & frame), Iookin' good!
 
 
 The card blank is die cut with Go Kreate Frilly Frame #5. Papers are by Prima and have been inked and sewn around the edges. I've also used Doo Hickey Lovely Fence & So Wrapped Lovely dies and Tim Holtz Butterflight Movers & Shapers die to make the 2 larger butterflies.
 

DISTRESS INKS:
Skin: Tattered Rose, Vintage Photo 
Hair: Antique Linen, Walnut Stain
Cheeks: Aged Mahogony
Dress & butterfly body: Pumice Stone, Frayed Burlap
Tights & butterfly wings Victorian Velvet, Aged Mahogony
Shading: Pumice Stone, Walnute Stain, Black Soot
 
I added Crystal Glamour Dust to the tights & butterfly body and Crakle Accents to the butterfly wings.
 

Above shows Tim Holtz Butterflight on the edge die, bottom layer cut from coreogated card taken from an old box & top layer cut from Core'dinations Whitewash cardstock - as is Floral Oval Spellbinders die.  have been inked with Walnut Stain using a blending tool.

 
Above shows the Martha Stewart clay frame with LOTV sentiment.

Rubber Buggy Products Linked Below:
 
Prima papers
Flowers & Berries
Pearl Bead String

 I'd like to enter into the following challenges:

Magnolia Mania - Special Shaped Card
7 Kids College Fund - April Showers/May Flowers
Simon Says Stamp - Happy Mail
Stampin for the Weekend - Dies/Punches


Tuesday, 23 April 2013

Deep Ocean 'Fave Colour Combo'

Hi there, today brings us another challenge over at Deep Ocean, where we have a fabulous sponser
Live and Love Crafts. They are actually undergoing maintenace at this particular moment in time but Sandy says they should be up and running again very soon with an even bigger & better web site! This challenge we'd like to show us your fave colour combo.
 
I'm really excited to be sharing with you my very fisrt ever Scrapbook page! I've been meaning to get around to Scrapbooking for sooooo long. Ages ago I pronted out loads of B&W photos of the kids to use for it & they've been just sat around in my lil' vintage trunk ever since...so I decided it was about time they were put to use!


Choosing may fave colour combo is quite a task as I'm defo a colour girl! I love to use pastel colours and always favour a soft muted pallet, I love pink & blue, pink & yellow, blue & cream, but one of my all time classic faves is pink & grey! I used these stunning papers by Maja design from the Basic Summer collection & found the sketch on Scrapbook.com who have loads of fab page layouts to work with.


The pic is my baby girl Lola-Rose & I just wated to do a really simple layout to show of this beautiful photo that I love of her with her head band in, which she is FORCED to wear - much against her will! ha. Yes it is a battle and she does take it off about 5 times a minute, but I find persaverance is the key... failing that bribabry works well too! (he he!)
 

I added loads of banner shapes underneath the right hand side of the photo - as per the sketch & just love this effect - how hot are these banners right now?!! Below is a Martha Stewart clay frame that I made with my new purchase (Martha Stewart clay kit). Wow I just LOVE this product, how soft & pliable is this clay? I mean it literally feels more like foam than clay - it's so soft & bendy, but stick it on your project & you'd never know - it looks just like the real deal...Martha you are a genius!
 
 
 The name is typed & printed out, the font is called 'Jellyka Western Princess' and can be downloaded from www.dafont.com. I  wanted to give almost a certificate feel to the frame so added another banner underneath then decorated with flowers.
 
 
To create this effect I stamped my Magnolia chicken wire stamp in black ink, then made a tear in the paper, I then stamped my Tim Holtz Urban Chic heart with banner upside down on the top rip and turned 90degrees on the right hand side rip so the spray at the top of the stamp lined up with the tear, I stamped in Versa-Mark ink then sprinkled my other fab new purchase Frantage embossing powder in shabby pink, I set with a heat gun then sprinkled more powder over the heart section to fill it in & set again with a heat tool. Lastly I adhered some cheese cloth inside along with some kort & godt berries - Lovin this effect will defo be using again!
 
 
Thanks for looking.
xxx
 

Saturday, 20 April 2013

The Rubber Buggy

Morning crafters, I'm Deb and today it's time for me to post over are The Rubber Buggy. An exciting new store stocking a wide range of Magnolia stamps as well as Saturated Canary, Tim Holtz, Graphic 45, Prima and much, much more. 
 
Today I have simple a tag card with coloured Magnolia image.The 'tag card' is folded at the top so it opens tent stlye, basically it looks like a tag & opens like a card. To make I create a 6x4" tent fold card blank and with the card in portrait orientation trim one of the top corners (either with scissors if your free hand cutting is ok or with a trimmer if prefered), then turn the cut off corner piece over back to front & position over the other top corner to use as a guide - this way the conrers will be of equal size and angles (just ensure you get it the correct orientation when cutting).


Image is 'Ice Tilda' from the 2011 Christmas collection, I colour with Tim Holtz Distress Inks onto watercolour paper. The glitter is Crystal Glamour Dust and is applied to the skirt, ice boots, collar and ear-muffs.
 
 
Distress Inks:
Skin - Tattered Rose, Pumice Stone
Hair - Antique Linen, Pumice Stone
Ear Muffs, Collar, skirt & boots - Milled Lavendar, Pumice Stone
Hand muff & socks - Pumice Stone
 

Dies Used:


Materials:


Thursday, 18 April 2013

Marvelous Magnolia 'Bring on the Bling'

Hey there - today's Thursday which means time for another Marvelous Magnolia challenge. This time the theme is 'Bring on the Bling' so get your glitter & gems out & show us what you got!
 
We've got some great sponsers this week for the lucky winners and these are...


&


On to my card, I used 'Tilda hiding Heart' from the 'With Love' collection and some scrummy papers from the Maja Design Basic Summer collection...


These papers are just to die for, I am sooooo hooked  on Maja Design right now! Loving my new Tilda stamp too, which can be purchased from The Rubber Buggy (click on store link above).
 
 
The edges have been inked with Pumice Stone Distress Ink using a blending tool, then slightly distressed with a craft knife and machine stiched.
 
 
Image has been coloured with Distress Inks, the Dress is Spun Sugar and Victorian Velvet. I then added a touch of Aged Mahogony and shaded with Pumice Stone and Soot Black.
 
 
The sentiment is by LOTV I inked up in a Sepia brown Archival ink, then added black round the edges of the stamp before making the impression to give a shaded effect. Die cut is Spellbinders Fancy Tags 3, cut from cardstock then covered in Picket Fence Crackle Paint.
 
 
 I am LOVING these zips at the mo! I always used them on my cards at one time and seem to have forgotton about them recently so its great to see them around again, I'm after the Prima ones really but these (pulled off various items of my childrens old clothes! ha) will have to do for now!


Lovely Fence Doo Hickey die (above) cut from Core'dinations cardstock (again I'm so hooked on this card right now too!) I them added some Picket Fence Crackle Paint which seems to have made the ink from the cardstock run & give a really nice shabby inked effect...which I totally planned (well not really) but will defo be doing it again - its a great look!
 
I'd like to enter into the following challenges:
Live & Love Crafts - BINGO (Full House!!! - see below)


Thanks for looking!
xxx
 

Tuesday, 16 April 2013

The Rubber Buggy 'Masking scene with Pop-up's'

Hi all, today I am posting for The Rubber Buggy design team - my upmost appologies as this should have been posted on Saturday, which will be my day to post there. However we have all had a really bad sickness bug and I've just been completely out of action for days!
 
 
I have made a Pop-up card with a scene background I created by using a masking technique. Please see the tutorial below on the masking technique.
 
 
Above the sentiment is by LOTV on a Spellbinders oval die, layered over a Spellbinders ornate oval die cut from Bazzil cardstock. Flowers are a mixture, small white ones are by Kort & Godt and berries are by Magnolia.
 
 
The Tildas are 'Hello Little Butterfly' and 'Kneeling Tilda' from the Butterfly Dreams 2011 collection. The stone path is from the same collection, the cloud is from the With Love 2013 collection, and the wishing well is actually a Pixie Cottage stamp.  


All the images have been coloured with Distress Inks & highlighted with Crystal Glamour Dust.
 

The Pop-up elements have been added by creating a 3D box (shown below). Begin by cutting a cm strip of card then score 4 lines - here the left pop-up is scored at approx 2", 1", 2", 1" intervals to give an idea of size. When folded into a box with the end secured they need to be adhered on the back side and bottom right up to the crease when the card is at a right angle, then position your pop-up element (in this case the Tilda's) and adhere to the front side. The card and pop-up elements should fold away flat when the card is closed, then 'pop-up' when opened.
 
 
MASKING TUTORIAL:
 Make the scene above in 11 easy steps!
 
The general principle of masking technique is to stamp the object that is nearest to the point of view and gradually work backwards, in this case the wishing well is nearest to the front so we'll begin with that...
 
 
Step 1) Begin by cutting a square of watercolour card approx 5" (I use Langton extra smooth Hot Pressed). Stamp the Pixie Cottage wishing well image slightly to the left hand side.
 
 
 Step 2) Stamp the same image again onto scrap paper and carefully cut out.
 
 
 Step 3) Position the cut out wishing well directly over the origional image.
 
 
Step 4) With the 'mask' in place now stamp the stone path image, positioning so the wishing well is in the middle of the flowers that are on either side of the stone path stamp. (pic shown with mask removed)
 
 
Step 5) Re-position the mask then stamp the Magnolia cloud (from the 2013 With Love collection) so it overlaps the laft hand side of the wishing well.
 
 
Step 6) (Note: the rest of the card is created without need for the mask) Stamp another cloud to the top right.
 
 
Step 7) Position the Stone Path here (to the right of the origional stone path) and stamp.
 
 
Step 8) Repeat the previous step with the Stone Path here (now to the left) and stamp again.
 
 
Step 9) Now turn the stone path stamp upside down so that the stones are at the top. Position as shown above and stamp.
 
 
Step 10) Stamp again slightly to the right (try to fill in the gaps with stones).
 
 
Step 11) Lastly I finished by adding some tiny butterfly stamps from a Hero Arts sentiment stamp set.

I'd like to enter into the following challenges:

MDUC - Masking
Tilda's Town - Flowers Everywhere
Totally Tilda - BINGO (bottom row)
Lovely Hangler or Sweet Magnolia - Spring


Rubber Buggy Challenge 'Lace'

 
Hi there and today I'm really excited to be posting for The Rubber Buggy challenge and this time we'd like you to use lace. For avid Magnolia fans you will probably allready have come across the new Rubber Buggy store as they have been sponsering several of the Magnolia challenges. They stock of course all Magnolia stamps & champion all things shabby and vintage, brands include Tim Holtz, COPICS, Saturated Canary, Prima, Graphic 45 and Teresa Collins. If you haven't allready been over to the store it's really worth checking out, just click on the link here.
 
 
 I made this using 'Tilda with Ballet Shoes' from the 2012 Prince & Princess collection. The papers are by Maja Design, edges have been inked & sewn.
 
 
 Image has been coloured with Tim Holtz Distress Inks & highlighted with Crystal Glamour Dust.
 
 
Distress Inks:
Skin: Tattered Rose, Vintage Photo
Cheecks: Aged Mahogony
Hair: Antique Linen, Walnut Stain
Dress: Pumice Stone, Black Soot
 
Highlighted with Crystal Glamour Dust


The Die Cuts below are the Magnolia Doo Hickey So Wrapped Die with the heart cut off. Zips are so 'in' right now, I used to use them all the time when I very first started making cards & just forgot about them so loving seeing them around again, this ones been pulled off one of my daughters old jackets!


Scalloped Tag     Ballerina Tilda      Berries (whitely)   Berries (creamery)


   Bead string       Tattered Rose      Vintage Photo      Antique Linen


    Walnut Stain         Black Soot        Aged Mahogony


MY MAGNOLIA SLIDESHOW

LinkWithin

Related Posts Plugin for WordPress, Blogger...